

5 Best Tips for Pulling Handles in Pottery
‘Pulling’ a handle is an excellent way to make a smooth, beautifully shaped handle that be attached to pots to make mugs, cups and jugs.
But how exactly do Potters ‘pull’ handles in pottery? It may seem really technical but ‘pulling’ a handle is just the process of repeatedly smoothing a roll of clay, held vertically, by a hand using water. Pulling is really a misnomer because the clay is smoothed rather than ‘pulled’. It is this smoothing action that gradually makes the clay longer and thinner. Handles can be pulled ‘off the pot’ where one end of the clay is already attached to the side of the pot and pulled from there, or they can be pulled on their own from a piece of clay, and attached to the pot later.
In this blog post we discuss 5 top-tips for pulling handles in pottery.
Tip #1 Make sure the clay is thoroughly kneaded or ‘wedged’ as Potters call it.
Why? Wedging the clay ensures it is thoroughly mixed and that there are no bits of differing dryness, lumps or air bubbles in the clay. If the clay is not properly wedged there may be bumps or cracks in the handle that cannot be smoothed out, or the handle could crack when fired, or even explode due to a trapped air bubble. I usually wedge clay for around five minutes before making a handle.
Tip #2 Use dryer rather than wetter clay
Why? When pulling handles you are adding water to the clay each time you smooth it. If the clay is too wet it may become too soft and break whilst being smoothed. Using dryer (or harder) clay will mean that you can get your handle as thin as you want with less chance of it breaking. The handle will also take less time to dry to the leather-hard stage which is the ideal stage for attaching the handle to a pot.
Tip #3 Make the starting roll of clay nearly the same thickness as the finished handle
Why? When I started to practice pulling handles I used big rolls of clay that I then spent ages smoothing down to the right size. Then it suddenly occurred to me why not make the roll of clay nearly the same size as the finished handle size and save all that time smoothing?! I found that this took much less time and effort and the handles looked just as good. The other benefit of this was that the clay stayed drier, was less prone to breakage and also took less time to dry to the leather-hard stage when I could attach them to the pot.

Tip #4 Set the handle in the same position it will be on the pot
Why? When I was learning to pull handles I followed the method of hanging them off the edge of tables to dry a little before attaching them. But I found that if the handle was too wet it was tricky to attach and I often accidentally damaged the smooth finish of the handle. If the handle was too dry, it often cracked when I curved it into the shape I wanted.
So I started setting handles into the curved shape I wanted as soon as I’d made them. I now let handles dry to the leather-hard stage in this position before attaching them to the pot. This is a much better method that results in less cracking and damage to the handle.
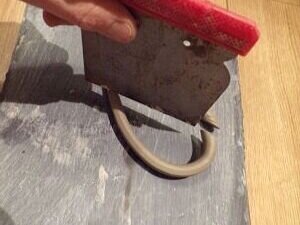
Tip #5 Use a decorating tool to cut the handle
When the handle has dried to the leather-hard stage I use a decorator’s filler scraper tool to chop the handle to the right size. The tool cuts right across both ends of the handle, ensuring that the correct angle for attaching the handle is cut every time. Once the handle is cut I hold it up to the side of the pot to check that it looks like the correct size for the pot.
If you’ve never tried pulling handles hopefully this has inspired you to try (you can do it!). If you’ve pulled handles before hopefully these tips will make your handle pulling quicker and easier.
If you’d like to learn more about some simple ways to make pottery more eco-friendly, or how to make your own pottery glaze, there are books and courses available on the Oxford Clay Resources for Potters webpage.