
How to Fire Pottery. What is a Kiln Firing Schedule?
Find out how ceramics and pottery are fired, what the different types of kilns are and what a kiln firing schedule actually is.
One of the things about making your own pottery and practising at home rather than at an evening class or community pottery is that you can't just fire what you’ve made in your home oven. Pottery needs to be heated to extremely high temperatures to properly mature the clay and glaze. High-fire glaze firings can reach temperatures of 1300 degrees Celsius or 2372 degrees Fahrenheit! This is why you absolutely need a pottery kiln in order to fire your pottery pieces to the right temperature.
In this blog post, we’ll cover how to fire pottery, what the different types of pottery kilns are, and how to create your own electric kiln firing schedule for firing bisque and stoneware pottery pieces.
Choosing a pottery kiln
Each type of pottery kiln can fire to a different temperature range. This is important because different types of clay body need to be fired to different temperatures (either earthenware or stoneware).
Kiln sizes are usually measured in litres to give you an indication of their internal dimensions. It is important to get a large enough kiln if you make larger pieces, or the best option may be a smaller kiln if you only make small pieces or want to fire your kiln more often. Very large kilns are usually loaded from the side whereas top-loading kilns are usually a little smaller and have a kiln lid that is opened up and the clay items are lowered inside.
The amount of time it takes to fire a kiln also differs depending on how well-insulated the kiln is. This is usually indicated by how thick the kiln walls are. At Oxford Clay, I use a very well-insulated kiln so it takes one day to heat up and over two days to cool down!
How are pots fired?
Generally, ceramic pieces are fired in two firings. The first firing is known as a bisque firing. The second firing is known as the glaze firing. Bisque firing temperatures range from 960 to 1000 degrees Celcius or 1760 to 1832 degrees Fahrenheit. During this firing organic material is burned out of the clay and the clay particles fuse together in a process known as sintering.
After the bisque fire pots are then glazed with the right type of glazes, either an earthenware pottery glaze (also known as low fire pottery glazes) or a stoneware pottery glaze (also known as high fire glazes), depending on whether the pot will be fired to lower temperatures in the case of earthenware clay or a higher temperature if stoneware clay was used. The pots are then fired again in the glazing firing.
What is the difference between Earthenware and Stoneware glaze firings?
Earthenware glaze firing temperatures are between 1020 to 1180 degrees Celcius or 1868 to 2156 degrees Fahrenheit. In the case of stoneware, the glaze firing temperatures are between 1180 to 1300 degrees Celcius or 2156 to 2372 degrees Fahrenheit. Stoneware clay can be glazed with earthenware glazes and fired in an earthenware glaze firing, but earthenware clay cannot be fired to stoneware temperatures because it will start to melt in the very high temperatures of a stoneware glaze firing.
Do you always have to fire pottery twice?
You actually don't need to fire clay twice. Some Potters use a practice known as raw glazing where they only do a single firing all the way up to the glaze firing temperatures, without bisque firing first. Many Potters don't practice this because it can be technically quite difficult, as re-wetting pieces of clay that have not been fired with glaze can cause them to disintegrate. You also need to use the right ceramic glazes and strong types of clay.
However, if you are interested in trying out this different method of firing pottery, there are 10 raw glazing glaze recipes in the book Eco-conscious Pottery Glazing by Oxford Clay. I practice raw glazing at Oxford Clay for my high fire stoneware pottery.
What are the different types of pottery kilns?
Electric Kiln
Electric kilns are probably the easiest and most convenient for Potters to use. Electric kilns are often very energy efficient, easy to install and use, and affordable to run. Many electric kilns can run on a domestic energy supply, rather than what is known as a Phase 3 in the UK or an industrial power supply.
Because many electric kilns run on a domestic electricity supply they can be fitted by an Electrician using an isolator switch. Electric kilns are usually controlled by an electric programmer that plugs into the kiln and sits next to it in a special holder. This programmer is what tells the kiln to heat at certain temperatures and for how long. Electric kilns allow oxygen into the firing chamber as it heats, creating an atmosphere inside the kiln known as an oxidation firing.

The Electric Kiln used at Oxford Clay. You can see the kiln programmer on the right-hand side.
Fuel-Burning Kilns
All other kilns run on a specific type of fuel burned by various methods. Fuel-burning kilns can be built in different ways and the different kiln shapes are known as downdraft, updraft and crossdraft kilns. The heat source comes from burning different fuels. One benefit of fuel-burning kilns is that they can create a kiln atmosphere without oxygen which is known as a ‘reduction firing’. Reduction and oxidation firings produce different colours in ceramic glazes. Copper oxide for example makes a bluey green colour in an oxidation firing and a deep red colour in reduction firings.
Gas Kiln
A gas kiln is powered by either natural gas or propane gas. They can run off a domestic gas supply or can be powered by bottled gas. Gas kilns often have small holes in the door covered by a piece of glass known as a spy hole, where the kiln inside can be viewed.
Gas kilns are more of a manual kiln because the temperature of gas kilns is controlled by a Potter switching the gas supply up and down, unlike electric kilns which are controlled automatically. Often pyrometric cones are used to tell the temperature of the kin inside as when the cone melts the correct temperature is reached. Pyrometric cones are placed in view of the spy hole so Potters can see when they have melted.
Oil Kiln
Oli kilns are heated by burning either heating oil, engine oil or cooking oil. They can be updraft, downdraft or crossdraft in their design and require special equipment to drip the oil into the kiln and mix it with air for combustion.
Wood-Fired Kiln
Wood-fired kilns are the most ancient forms of fuel-burning kilns having been used by Potters for thousands of years. Wood is burned around the ceramics pieces and the kiln requires very specific dimensions to ensure that the inside of the kiln gets hot enough to fire properly.
Wood-fired kilns often need to be refuelled during the firing process and can take a long time to fire. In the book ‘Katharine Pleydell-Bouverie: A Potter's Life 1895-1985’ letters from the Potter Katharine Pleydell-Bouverie to Bernard Leach refer to her having to stay up all night adding wood to the fire in her wood-fired kiln.
Raku Kiln
A raku kiln can be created from any fuel-burning kiln where the pottery inside can be easily accessed. Once when I attended a raku firing pottery workshop we used a portable gas-fired kiln outside and then used metal tongs to remove the clay pots from the kiln when it reached maturity. Raku kilns are normally used at the glaze firing stage. First, a special raku glaze is applied to bisque-fired pottery. Raku glazes are designed to melt at low temperatures of around 1000 degrees celsius or 1832 degrees Fahrenheit.
Once the clay pieces inside the kiln reach this temperature and the pottery glaze has sufficiently melted, the clay objects are removed from the kiln and either left to cool naturally, or rolled in a flammable material such as sawdust, paper or leaves. This creates a decorative effect on the pottery such as interesting colours, patches of smoke-coloured clay and crazing in the glaze.
At the raku workshop, I attended we then dunked our pottery in cold water to cool it immediately. That's the best thing about this type of firing, you get your finished ceramics immediately and don't have to wait for the kiln to cool down!
Raku kilns are generally used to fire decorative pieces, as the firing process and glazes used are not suitable for tableware.
Pit Firing
Pit fire kilns replicate the earliest forms of kilns ever used by Potters. Pit kilns are created by digging a hole in the ground or building up the sides with bricks. Pots are laid on a bed of sawdust and then covered with more sawdust, sticks and wood. The top layer of sticks and wood is then lit.
Once the fire pit is properly alight, the pit kiln is then covered with earth or a sheet of corrugated iron and left to burn down. Similarly to raku kilns, pots will be bisque-fired first before being fired in a pit kiln. Pit kilns are used to create decorative effects on pots. Often metal oxides are added to the top layer of sawdust to create colours in the pottery.
Smoke Firing
Smoke firing is very similar to pit-firing but the temperatures reached inside the kiln are a little lower at 800 degrees Celsius or 1472 degrees Fahrenheit. As in the case of raku and pit kilns work is bisque-fired first, usually in an electric kiln. Smoke firing is used to create decorative pieces, coloured browns blacks and greys by smoke from burning wood, grass, leaves or sawdust.
Strong types of clay need to be used in raku, pit and smoke-fired kilns because the pottery will be exposed to different temperatures throughout the firing process, and needs to be able to withstand thermal shock.
What is a Kiln Firing Schedule?
The term kiln firing schedule refers to the speed, time and temperatures kilns are heated to complete the ideal firing conditions for the pots inside. It is important to use the right kiln firing schedule for the right clay and glaze. If a pot is heated too quickly during a firing it can damage it or even explode in the kiln! If the kiln is heated too slowly it can simply waste energy.
If the kiln is heated too hot for the type of clay used, it can melt and warp the pot. If the kiln is not heated hot enough the clay won’t reach maturity and may not be sufficiently vitrified. Vitrification is important in pottery because it permanently changes the clay particles and transforms clay from a porous material that can let water through, to one that can hold water. This is crucial when making pieces like mugs, jugs and vases, which are designed to hold liquid.
All kilns will have a kiln firing schedule and information on these can often be found in books or from kiln manufacturers. There is a downloadable PDF kiln firing schedule for an electric kiln at the end of this blog post. This kiln firing schedule will teach you how to fire pottery in an electric kiln, in a bisque and stoneware (or ‘high-fire’) glaze firing.
What is a kiln firing ‘Programme’ for an electric kiln?
A full kiln firing from start to finish is usually referred to as a ‘programme’ on a kiln programmer also known as an electronic controller. For example, in the electric kiln I use at Oxford Clay, ‘programme 1’ is the bisque firing and ‘programme 2’ is the stoneware glaze firing. When firing work I select programme 1 or 2 from the programmer menu and then press the ‘start’ button on the programmer to start the firing. The programmer does all the work of telling the kiln how fast to heat and for how long, resulting in a completed firing.
Most electric kiln programmers hold a number of different programs. For example, a Potter could have a bisque firing schedule programmed into their kiln programmer, an earthenware glaze firing and a stoneware glaze firing.
How do you know what information to put into the kiln programmer for the firing?
There are several pieces of information you need to programme into the programmer for the kiln to complete a successful firing.
1. The Set Point
The set point is the highest temperature that you want the kiln to get to for example in a stoneware glaze firing this would be 1260°C, And in a bisque firing this could be 950°C
2. The Ramp Speed
The ramp speed is the speed at which the kiln heats up. This is usually measured in degrees Celsius or Fahrenheit per hour. it is important that the kiln is heated slowly because this can cause cracking or even explosions in pots. For example, the ramp speed should be no faster than 100°C per hour at the beginning of a kiln firing.
Some programmes require different ramp speeds at different parts of the firing schedule. For example, the ramp speed at the beginning of the firing could be slower to allow water in the clay to evaporate safely (especially important in thick pots) and then the ramp speed during the later part of the schedule could be faster.
3. The Soak Time
The soak time refers to any parts of the firing schedule where the kiln is held at a certain temperature. The purpose of a soak is to allow the clay or glaze to mature in the heat. For example, in a stoneware firing a soak of 15 minutes at the set point ensures that the glaze melts properly on the pot. Different soaks can be built into one firing programme, to take place at different parts of the firing schedule.
4. The Section (also known as the Segment)
Another term that is used in kiln programming is ‘the section’ or ‘segment’. This refers to the different sections or segments of a kiln firing which could have different set point temperatures and ramp speeds. For example, the first section could include a slow ramp in temperature, the next section could include a faster ramp, and then a soak at the set point.
What happens after an electric kiln has reached the ‘set point’ (the hottest temperature)?
When the programmer senses that the kiln has reached its setpoint and has completed any soak required at the setpoint, it usually turns the kiln heating elements off. This allows the kiln to cool down naturally to room temperature, a process which could take 2 or 3 days!
Some Potters cool the kiln more slowly than this, using the heating elements. Cooling the kiln very slowly between certain temperatures can prevent glaze faults such as pinholes.
How to set up your own kiln in a home pottery studio
Electric kilns can easily be easily set up and used at home. You don't need a separate kiln room, you just need the following things:
A space that is well-ventilated as some clays and glazes create toxic fumes as they fire.
A space with at least one metre of space around the kiln to protect the walls and power supply from the hot kiln.
A secure space that is safe from people going near it when the kiln is on as it will get extremely hot.
A place that has access to an electricity supply where an isolator switch can be fitted by an electrician.
A non-flammable surface for the kiln to sit on such as a concrete floor or some special fire-proof tiles.
The first thing to do is to decide which glaze firing temperature you want to fire to, either low-fire (earthenware) or high-fire (stoneware). You may have also heard of these being referred to in reference to pyrometric cones, such as cones 5 or 6 for low-fire or cones 9 or 10 for high-fire. Electric kilns are manufactured to either reach a maximum temperature of low-fire glaze or high-fire glaze firing temperatures so you will need to decide whether you want to fire to earthenware or stoneware temperature before buying your electric kiln.
Once you have found a suitable and safe spot for your kiln you need to get the kiln installed by a qualified Electrician. The Electrician should fit an isolator switch to a wall near the kiln so the power can be turned off to the kiln using this switch. This will also ensure that the kiln has the correct amp fuse fitted for safety.
Firing an electric kiln for the first time
When electric kilns are fired for the first time, for best results before firing clay they need to be fired empty, on a special firing schedule. The kiln manufacturer will provide the ideal firing schedule for the first kiln firing. It is also a good idea to paint a little kiln wash, also known as batt wash inside the base of the kiln before the first firing.
The final step is to paint a batt wash or kiln wash onto any kiln shelves before they are used inside the kiln. This will protect the kiln shelves from any accidental drips of pottery glaze during firings.
Batt wash or kiln wash does degrade during firings so it ideally needs to be re-applied when the kiln shelf looks as though it has lost the protective coating.
The good news is that once the kiln has undergone its first empty firing it is now ready to fire pottery!
Example Electric Kiln Firing Schedules
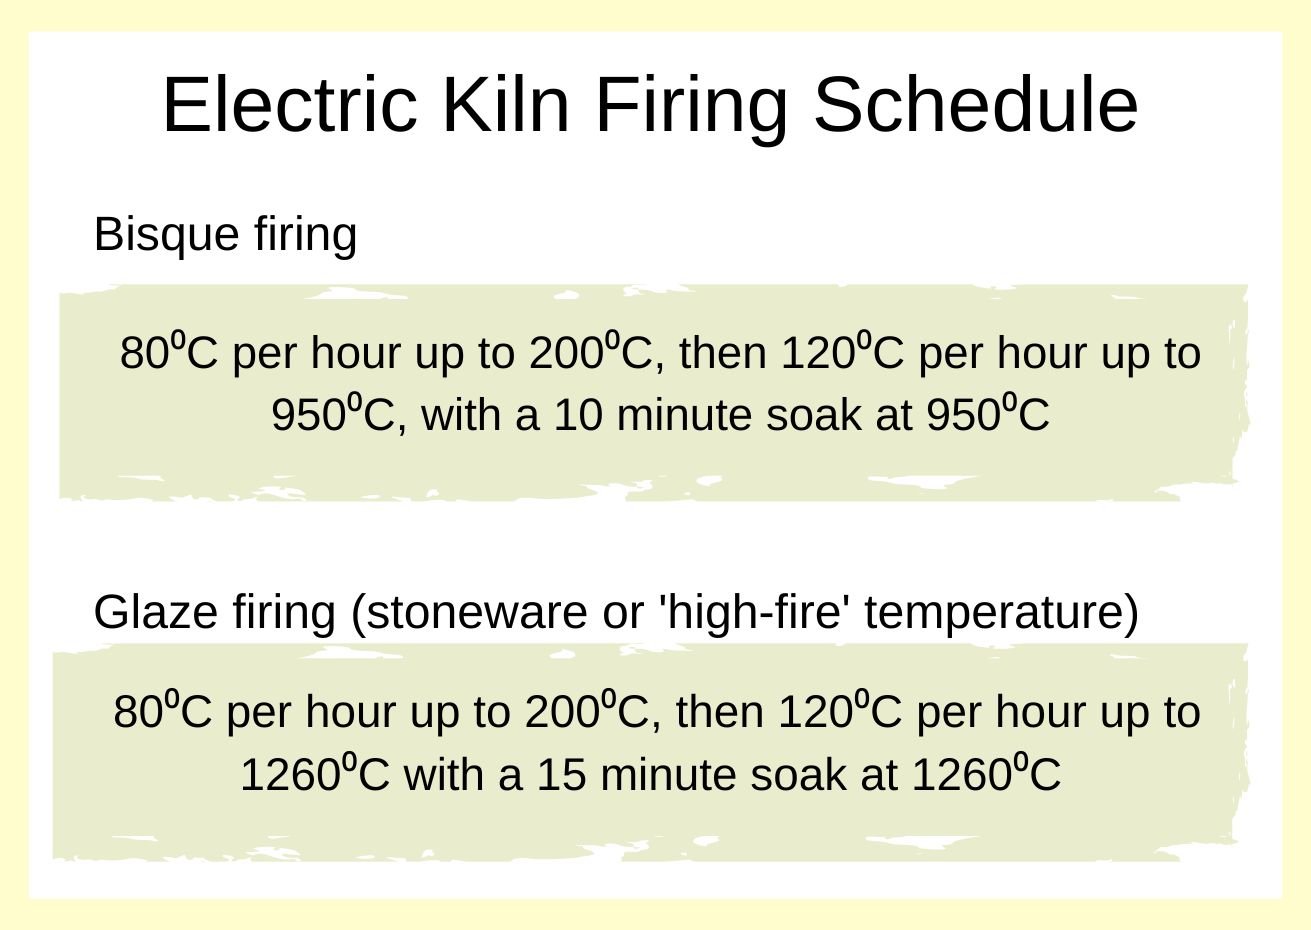
Here are the kiln firing schedules I use at Oxford Clay.
Bisque Firing
80⁰C per hour up to 200⁰C, then 120⁰C per hour up to 950⁰C, with a 10 minute soak at 950⁰C
Stoneware Glaze Firing
80⁰C per hour up to 200⁰C, then 120⁰C per hour up to 1260⁰C with a 15 minute soak at 1260⁰C
The Kiln Firing Schedule Used at Oxford Clay
References:
Brierley, B. 2014, Firing Kilns. London: Bloomsbury Visual Arts