
What is Raku Pottery?
The term raku can both refer to an ancient type of Japanese pottery and a modern method of making ceramics. In this blog post, we’ll explore what raku pottery is and how modern Potters make raku pottery today.
We will also explore a beautiful stoneware glaze that looks like raku, but can be fired in an electric kiln without needing to have your own raku kiln!
What is historical raku pottery?
Raku is a form of Japanese pottery. Raku first appeared in medieval Japanese ceramics during the 16th century in the Momoyama period, around 1550.
Japanese raku pottery was traditionally used for making tea bowls for use during a Japanese tea ceremony. Raku tea bowls were known as both ‘blackware’ and ‘redware’. Redware was simply red earthenware clay with a clear glaze applied. Blackware was made from stoneware clay with a black glaze applied.
In the traditional Japanese firing process of raku, pots were first bisque-fired, then glazed and fired again. The crucial difference between raku pottery and other firing methods is that pots are removed from the hot kiln whilst still hot and are left to cool quickly in the open air.
Raku pottery was often crazed because the rapid heating and cooling of the pottery caused tiny cracks to appear in the clay and glaze. This is one of the reasons why raku pottery was used in Japanese Tea ceremonies. Tea bowls made with un-crazed glazes were said in Japanese culture to disturb the calm atmosphere of the tea room through the harsh loud sound of the tea being whisked in the bowl. Whereas raku ware tea bowls made with crazed glazes made a quieter, duller sound.
What is modern raku pottery?
Modern raku pottery was thought to have been introduced to Potters outside Japan by Bernard Leach. In 1911 whilst living in Japan Bernard Leach attended a raku pottery party. Those at the party painted their own pots and then fired them there and then at the party.
Although Bernard Leach was a painter at the time, this party was said to have inspired him to start practising pottery! More and more Potters were then introduced to the traditional method of raku firing and it became a contemporary pottery technique in its own right.
The modern American raku ceramics movement began in the 1940s pioneered by Potters such as Hal Riegger and Warren Gilbertson. By the 1970s and 1980s raku had grown in popularity and become an art form practised by many studio Potters.
How is raku pottery made?
Raku pottery is made in a special low-temperature firing method. The firing temperature inside a raku kiln ranges from 800 degrees Celsius (1472 degrees Fahrenheit) to the highest temperature of around 1100 degrees Celsius (2012 degrees Fahrenheit).
Most non-raku pottery is fired in a kiln over a long period of time usually at least 8 - 15 hours. The pots in standard firings are heated and cooled slowly. However, raku pottery is heated very fast, sometimes in as little as 15 minutes up to low-fire glaze temperatures, just long enough to melt the glaze.
Raku pottery is then cooled extremely fast sometimes by plunging a pot into water, sometimes by cooling naturally in the air, and sometimes by plunging into some kind of combustible material such as paper, straw or sawdust.
The four steps of a raku firing process
Step 1
The first step is to bisque fire pottery in a standard firing process, usually, Potters do this in an electric kiln as they are easy to use and cheap to run. Raku is generally used as a final firing for decorative effect. Bisque firing pottery first strengthens the pot and ensures that glazes can be applied without the pot disintegrating. Once the glaze has been applied the pot is ready to be fired in a raku firing.
Step 2
The next step of a raku pottery firing is to heat the pot in a kiln enough to melt the pottery glaze. Pottery can be fired in an electric kiln at this stage but most raku pottery is fired in a small kiln heated by burning propane gas.
Powering a kiln with portable bottles of propane gas allow the kiln to be situated outside which is good for safety. Pots are fired in the kiln until the pottery glaze has completely melted on the surface of the pot. Once all the glaze has melted the pot is then ready to be removed from the kiln.
Step 3
The third stage of a raku pottery firing is the exciting part! While wearing heat-proof gloves to protect against high temperatures, a Potter uses metal tongs to remove the red-hot ceramic piece from the kiln still with molten glaze.
In contemporary raku pottery techniques, the pot is then often put into a heat-proof container with combustible organic material such as leaves, grass, paper or sawdust. A heat-proof lid is then usually placed on top of the container. The combustible material sets alight due to the heat coming from the hot pottery.

A raku fired pot being dropped into a metal container of straw
As the material burns it creates smoke and fire which colours the clay and glaze in an unpredictable way. The fire also uses up the oxygen in the closed container creating a reduction atmosphere, much, in the same way, a gas kiln can create a reduction chamber for firing. the molten glaze then solidifies as the pot begins to cool.
Many metal oxides in pottery glazes produce different colours in a reducing atmosphere than in an oxidising one. Copper Oxide for example makes the colour green, blue and turquoise when fired in an oxidising atmosphere. However, if Copper Oxide is fired in a reducing atmosphere it makes bright red colours.
It is the unpredictability of the raku method that makes some Potters love it so much. Completely different results can be achieved each time even with the same clay and glazes.
Step 4
The fourth step of a raku firing is to remove the pot from the combustible material and let it cool either naturally or by plunging it into a metal bucket of water. Again, Potters wear protective gloves and use metal tongs for the removal of pieces from the container.
Once the pot has completely cooled it can be safely handled. Often raku fired pottery will need to be cleaned to expose the full beauty of the pottery glaze surface underneath a layer of soot. The amazing thing about raku firings is that they are so instant, you can go from bisque-fired pottery to finished glaze-fired pot in less than an hour!
How can you tell if pottery is raku?
You can usually tell raku pottery by its appearance. Raku pottery will often be brightly coloured with turquoise blues and green glazes, or glazes that appear metallic or iridescent. The bare clay of raku pottery is often black due to the post-firing reduction process of putting the cooling pot in flammable material. The combustible material often sets fire because the pot is so hot and ‘smokes’ the bare clay leaving it coloured black.
A raku fired piece is also almost always crazed, with tiny cracks and lines appearing in the glaze. This is because the rapid heating and cooling of raku pottery cause the clay and glaze to become distressed and cracks to appear.
Raku pottery is porous. Because raku is fired at a lower temperature than other types of pottery it is often quite soft pottery in its final state. Raku pottery can only really be used for decorative pottery and cannot be used for tableware.
Do raku pots need to be made from special raku clay?
No. Raku pottery can, in fact, be made from any type of clay that can withstand the thermal shock of rapid heating and rapid cooling.
Many stoneware clays will be able to withstand these types of temperature changes without breaking. Clay bodies suitable for raku should also have an open porous structure that doesn't vitrify at low firing temperatures. Clays with grog, sand or grit added, for example, will be porous enough for raku.
Raku pottery does not need to be thicker than other types of pottery. A raku pottery piece can be hand-built or thrown on the pottery wheel. All types of pottery-making techniques will work with the raku process.
Do raku pots need a special raku glaze?
No. Many traditional glazes used in raku were lead glazes which were used because they melted at a low temperature. Lead glazes are now no longer used for safety reasons but raku pottery can actually be glazed with any low-fire glazes (also known as earthenware glazes).
Some commercially available pottery glazes are specifically made for raku pottery and some glazes are designed to look like raku glazes (with a crazed effect) but can be fired in an electric kiln. Raku glazes can be applied in the same way as other glazes, by pouring or brushing the glaze on or by dipping the pot in the glaze.
How to make your own high-fire stoneware glaze that looks like a raku-fired pot.
I discovered this glaze whilst testing recipes for the book Eco-conscious pottery glazing. I thought it was such a beautiful glaze and really looks like raku-fired pottery due to its crazing.
The raku firing process often relies on fuel-based kilns usually powered by propane gas. I liked the idea that I could get a similar look on my pottery to a fired raku piece, but I could fire it in an electric kiln powered by renewable energy. I also used recycled Wood Ash in this recipe.
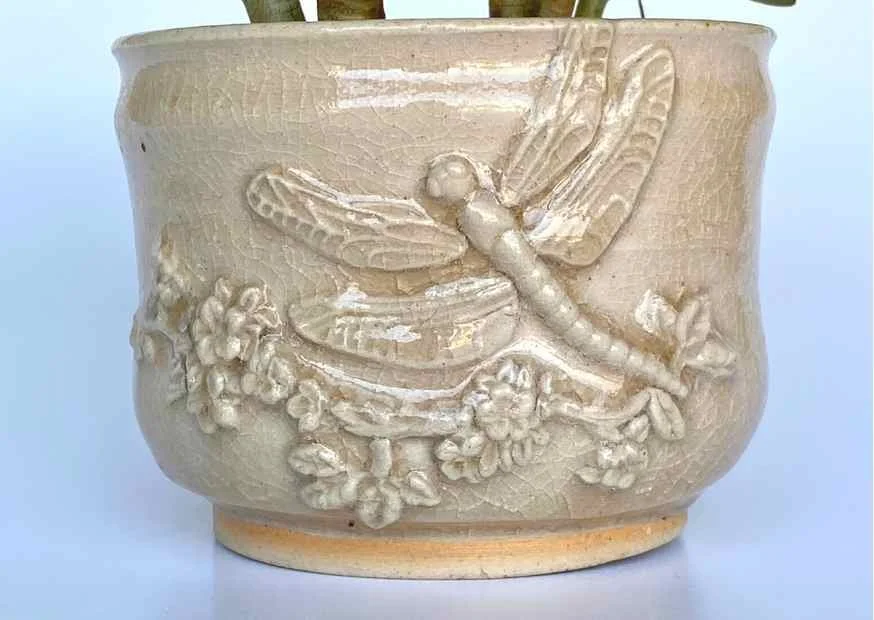
This high-fire stoneware glaze (recipe below) looks like a raku-fired pot.
The raku-style stoneware glaze recipe:
Flint - 17 (parts)
Feldspar - 32 (parts)
China Clay - 16 (parts)
Wood Ash - 32 (parts)
Whiting - 3 (parts)
The firing schedule for this glaze is in this free electric kiln schedule workbook.
If you'd like to know more about how to make your own pottery glaze I wrote a free workbook for you!